10 essential Procreate tips to instantly improve your environment art
How did your country report this? Share your view in the comments.
Diverging Reports Breakdown
10 essential Procreate tips to instantly improve your environment art
Procreate on iPad is one of the most accessible and powerful tools out there. We asked environment concept artist Daniel Włodarski to share 10 quick Procreate tips to help you easily paint immersive digital worlds. Read Daniel’s practical tips below. And if you’re just getting your bearings, don’t miss our curated list of Procreate tutorials for step-by-step instruction. Want something beyond the iPad? Check out our guide to the best digital art software and drawing tablets for every budget and style. The best iPad for drawing is the iPad Pro with Retina display. The iPad Pro has a screen resolution of 2,560 x 1,600. It also has a built-in touch screen that can be used to draw with a stylus or a pen. It costs £99.99, or you can buy it for £79.99 with a 32GB iPad mini, or £99 with the 32 GB iPad mini Plus. You can also buy the iPad mini with a screen protector for £49.99.
That’s where Procreate on iPad comes in. It’s one of the most accessible and powerful tools out there, blending intuitive touch controls with pro-grade features. Pair it with the best iPad for drawing and you’ve got a mobile studio that’s ready when inspiration strikes, whether you’re sketching alien wastelands or sun-drenched ruins on the go.
But even with great tools, getting started can be tricky. So we asked environment concept artist Daniel Włodarski, via our sister magazine ImagineFX, to share 10 quick Procreate tips to help you easily paint immersive digital worlds.
Read Daniel’s practical tips below. And if you’re just getting your bearings, don’t miss our curated list of Procreate tutorials for step-by-step instruction. Want something beyond the iPad? Check out our guide to the best digital art software and drawing tablets for every budget and style.
1. Experiment with colour (Image: © Florian Herold) Gradient Maps are an amazing and easy way to test different colour schemes for your painting, or even colour a greyscale piece in a timely and confident manner. You can iterate on work-in-progress pieces or try new variations for finished art. Unless you’re just experimenting, always try to apply Gradient Maps on top of a painting that already has a good value structure, as these will give you the best results.
2. Swap colours quickly (Image: © Florian Herold) Recolor might be my favourite tool in the entire app. As you’d expect, it recolours parts (or all) of your painting based on the currently selected colour, the values in your painting, and the location of a small crosshair that appears while using the tool. You can move this marker freely and set the strength of the recolour effect with the slider at the bottom of the screen. It becomes clear once you use it a bit. You can find Recolor in the QuickMenu by holding down one of the options and scrolling to the ‘R’ section.
3. Soft gradients (Image: © Florian Herold) I found that a tiny but effective trick to create a nice soft gradient in Procreate is to simply paint with a big brush on a new layer and add Motion Blur to it. You’ll find that in the Adjustments menu and, once selected, drag across the screen to determine direction and strength.
4. Show your process (Image: © Florian Herold) Create and save GIFs the quick and easy way! If you’d like to save a GIF of your painting’s process steps, for example, simply add each step as a layer from bottom to top (A), go to Animated GIF (B), and set the frame rate (C). If you’d like a certain frame, such as your final painting, to be shown for longer, all you need to do is duplicate that layer one or more times before saving, so no need for the Animation Assist timeline!
5. Step backwards You work on a piece for some time only to realise it was better before. In case you didn’t keep any layers or backups, Procreate’s Time-lapse replay feature is an awesome tool to backtrack and compare your current state to any previous version, make screenshots, and then adjust your paintings accordingly. I recommend downloading the VizRef app for handling references on iPad.
6. Simple selection Lowering the Selection Mask Visibility can make working with selections much less visually confusing, giving you a clearer view of any changes before committing. It can be set to a low value before becoming too unnoticeable. In the same way you can change the time it takes to start colour-picking, you can set a “Draw and Hold” delay: the time for a drawn line to become a certain shape while keeping the pen still on the screen.
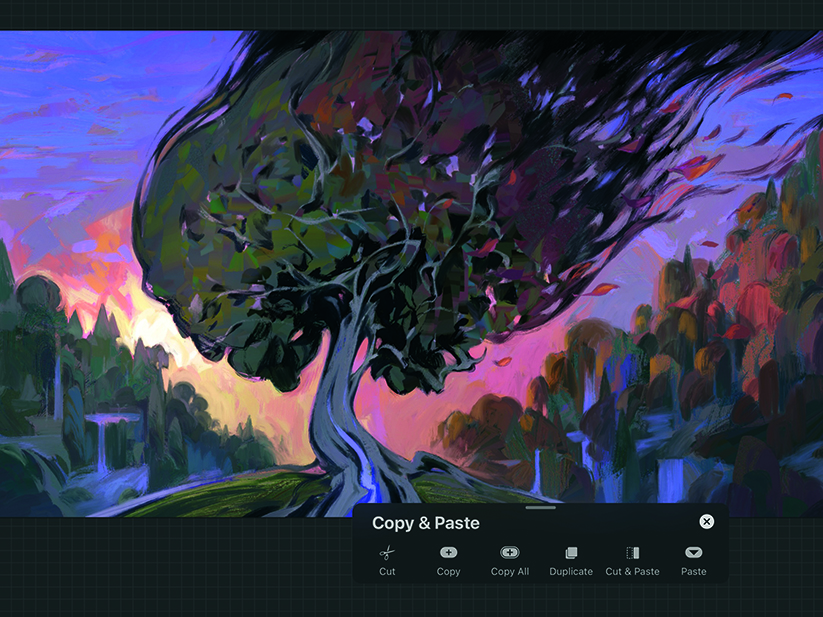
7. Swipe for Copy & Paste (Image: © Florian Herold) The Three-finger Swipe gesture is so useful for accessing the Copy, Cut, Paste, and Copy All options. That’s especially true for the latter, which copies everything currently visible and lets you paste it onto a new layer, or even another file. This comes in handy when you’re trying out different colour options in the middle of your process, adjusting curves before sending the work to a client, and so on. You can activate the Three-finger Swipe under Gesture Controls>Copy & Paste.
8. Go careful with Color Dodge layers (Image: © Florian Herold) Using the Color Dodge Blend Mode can lead to great results in terms of effects, glow, and lighting. However, it’s easy to overdo it and end up with too much contrast and overall brightness in your image. The best method that I’ve found to utilise Color Dodge is using dark, saturated colours on the layer, and brushes with a little texture. You can build up a glow with nice colours more subtly this way and always add stronger highlights later.
9. Be a little reckless (Image: © Florian Herold) Duplicating, transforming, and colour-adjusting layers is an excellent way to achieve some great-looking results that you wouldn’t have thought of otherwise. Lay bold brushstrokes and duplicated layers on top of your work with new Blend Modes (I love Lighter Color and Darken, while Difference, Subtract, and Exclusion are cool too), and erase or mask parts without being too precious with what’s already there. Of course, in the end, you want to control the chaos and make sure important parts are readable, but this reckless approach can make your paintings much more interesting.
10. Take a Step outside the box (Image: © Florian Herold) Don’t get stuck in the safe zone when creating; lines can be made on paintings, and bold paintstrokes added to line-art. Loosen up and mix whatever tools and styles you like to discover something new! At the same time, don’t force things just for the sake of being different. I’d say anything goes as long as you enjoy your creative process!
This content originally appeared in ImagineFX magazine, the world’s leading digital art and fantasy art magazine. ImagineFX is on sale in the UK, Europe, United States, Canada, Australia and more. Limited numbers of ImagineFX print editions are available for delivery from our online store (the shipping costs are included in all prices).